

Hardware & Code
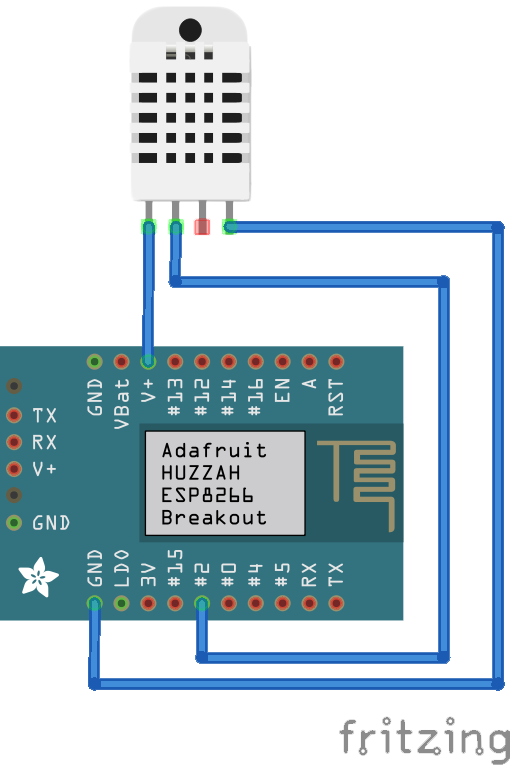
Lets write some code to put everything we've discussed so far into practice. This tutorial uses Arduino for ESP8266. We're extremely interested in this chip because of its availability and built in connectivity. The following code is for sensing temperature and humidity using a DHT11 sensor and Adafruit Huzzah Breakout board.
/** *

IOStash Simple Weather Station with MQTT EXAMPLE * *
Created on: 14.04.2016

* */

#include <ESP8266WiFi.h>
#include <PubSubClient.h>
#include <DHT.h>

#define DHTTYPE DHT11
#define DHTPIN  2
#define SLEEP_DELAY_IN_SECONDS  30

unsigned long previousMillis = 0;
const long interval = 2000;
const char* ssid = "YOUR WIFI SSID HERE";
const char* password = "YOUR WIFI PASSWORD HERE";
float humidity, temp_f;
const char* mqtt_server = "api.iostash-239ca9.ingress-alpha.easywp.com";
const char* mqtt_username = "YOUR_X-ACCESS-TOKEN_HERE";
const char* mqtt_password = "YOUR DEVICE SECRET HERE";
const char* mqtt_topic = "/your_x-access-token_here/deviceID_here/";

WiFiClient espClient;
PubSubClient client(espClient);
DHT dht(DHTPIN, DHTTYPE, 11);

String dataString;
char charBuf[100];
void setup() {
  // setup serial port
  Serial.begin(115200);

  // setup WiFi
  setup_wifi();
  client.setServer(mqtt_server, 1883);
  client.setCallback(callback);

}

void setup_wifi() {
  delay(10);
  Serial.println();
  Serial.print("Connecting to ");
  Serial.println(ssid);

  WiFi.begin(ssid, password);

  while (WiFi.status() != WL_CONNECTED) {
    delay(500);
    Serial.print(".");
  }

  Serial.println("");
  Serial.println("WiFi connected");
  Serial.println("IP address: ");
  Serial.println(WiFi.localIP());
}

void callback(char* topic, byte* payload, unsigned int length) {
  Serial.print("Message arrived [");
  Serial.print(topic);
  Serial.print("] ");
  for (int i = 0; i < length; i++) {
    Serial.print((char)payload[i]);
  }
  Serial.println();
}

void reconnect() {
    WiFi.begin(ssid, password);

  while (WiFi.status() != WL_CONNECTED) {
    delay(500);
    Serial.print(".");
  }
  while (!client.connected()) {
    Serial.print("Attempting MQTT connection...");
    if (client.connect("ESP8266_Client", mqtt_username, mqtt_password)) {
      Serial.println("connected");
    } else {
      Serial.print("failed, rc=");
      Serial.print(client.state());
      Serial.println(" try again in 5 seconds");
      delay(5000);
    }
  }
}

void getTemperature() {
  unsigned long currentMillis = millis();
  if(currentMillis - previousMillis >= interval) {
    previousMillis = currentMillis;
    humidity = dht.readHumidity();
    temp_f = dht.readTemperature(false);
    if (isnan(humidity) || isnan(temp_f)) {
      Serial.println("Failed to read from DHT sensor!");
      return;
    }
  }
}

void loop() {
  if (!client.connected()) {
    reconnect();
  }
  client.loop();
  getTemperature();
  dataString = String("{"temperature":") + temp_f + String(","humidity":") + humidity + String("}");
  dataString.toCharArray(charBuf, 150);
  Serial.println(charBuf);
  client.publish(mqtt_topic, charBuf );
  Serial.println( "Closing MQTT connection...");
  client.disconnect();
  Serial.println( "Closing WiFi connection...");
  WiFi.disconnect();
  Serial.println( "Sleeping for a minute");
  delay(60000);
}
This setup will write temperature and humidity values to IOStash every minute. An example of this particular setup is https://app.iostash-239ca9.ingress-alpha.easywp.com/feeds/5734997f8680bc62de000006/.
Go through the MQTT API docs to learn more about IOStash MQTT API and the available topics.